Google Analytics 4, or GA4, is the latest version of Google’s powerful tool that helps you understand how people use your website or app. For non-tech businesses, GA4 is a game-changer because it gives you clear insights into your customers’ behavior without needing to be a tech expert. By using GA4, you can see where your visitors come from, what they do on your site, and which parts of your business are working best. This information helps you improve your website, attract more customers, and make smarter business decisions.
Why does GA4 matter so much? Because in today’s digital world, knowing how users interact with your business online is key to growth. GA4 offers benefits like understanding customer journeys, tracking important actions (like purchases or sign-ups), and giving you reports that are easy to read and act on. Plus, GA4 is designed to work well with changing technology and privacy rules, so your business stays future-proof.
If you’re a small business owner or someone who isn’t tech-savvy, don’t worry. This guide will walk you through setting up GA4 step-by-step in simple language. You’ll learn everything you need to start tracking your website’s performance and using data to grow your business.
What You Need Before You Start
Before diving into GA4 setup, there are a few things you’ll need to have ready:
A Google account (Gmail): GA4 is a Google product, so you’ll need a Google account to use it. If you don’t have one, you can create it for free.
Access to your website’s backend or a web developer: To install GA4, you’ll need to add a small piece of code to your website. If you use website builders like WordPress, Shopify, or Wix, you can usually add this code yourself. Otherwise, you might need to ask your web developer for help.
Clear business goals: Think about what you want to achieve with your website. Do you want more sales, more newsletter sign-ups, or more people contacting you? Having clear goals will help you set up GA4 to track the right things.
Having these ready will make the setup process smoother and more effective.
Read Next: The Ultimate SEO Checklist After Google Updates 2025
GA4 Setup Guide for Non-tech Businesses
Now let’s look at the GA4 Setup Guide for Non-tech Businesses:
Step 1: Create Your Google Analytics Account
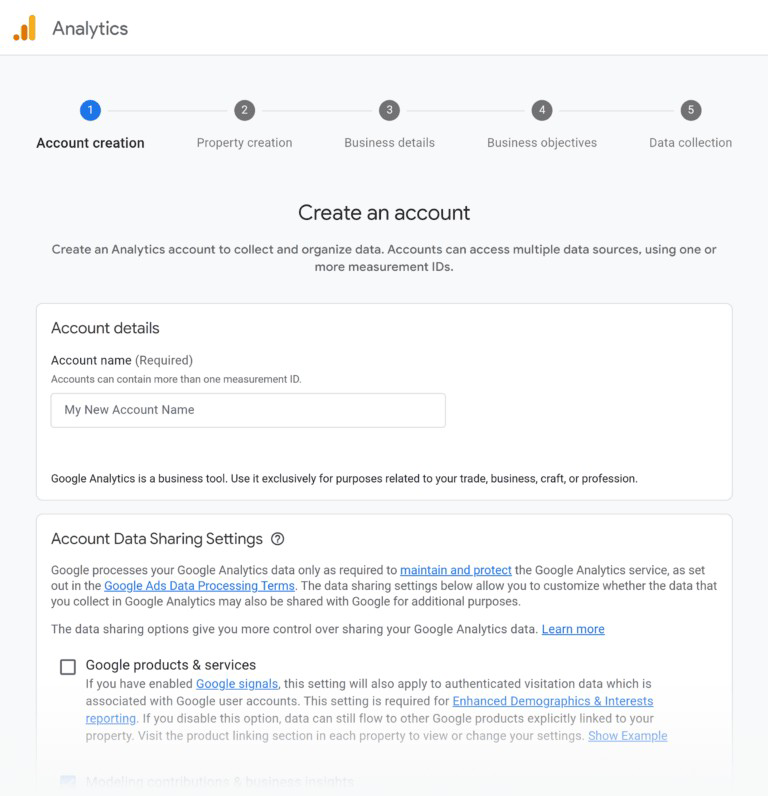
To start using GA4, you first need a Google Analytics account. Here’s how:
- Go to the Google Analytics website (analytics.google.com).
- Sign in using your Google account (your Gmail).
- Click on the button that says “Start measuring” to create a new account.
- Enter your business or website name as the account name. This helps you identify your account later.
This account is like your main dashboard where all your website data will be collected and stored.
Step 2: Set Up a GA4 Property

Next, you create a property in your Google Analytics account. A property is where your website’s data is collected.
- During the setup, choose to create a new GA4 property.
- Enter your website’s name.
- Select your time zone (where your business is located) and your currency (for sales tracking).
- Choose your business category (like retail, education, or services) and your business size.
- Read and accept Google’s terms of service.
This step links your Google Analytics account to your specific website, so GA4 knows where to collect data from.
Step 3: Add a Data Stream
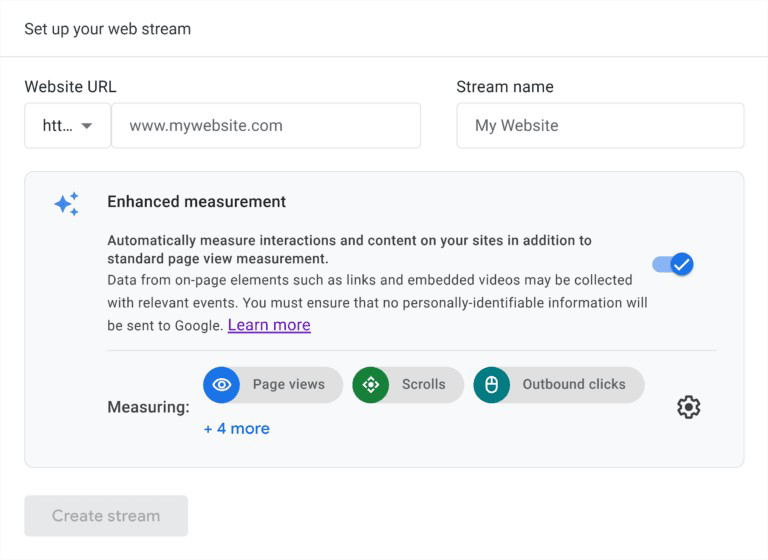
A data stream is how GA4 receives information from your website.
- Choose “Web” as your data stream type since you’re tracking a website.
- Enter your website’s URL (the web address).
- Give your stream a name that helps you remember it (like “My Business Website”).
- Keep the “Enhanced Measurement” option turned on. This feature automatically tracks common actions like page views, clicks, and downloads without extra setup.
Adding a data stream is like opening a channel for your website to send data to GA4.
Step 4: Install the GA4 Tracking Code
Now, you need to put the GA4 tracking code on your website so data can start flowing.
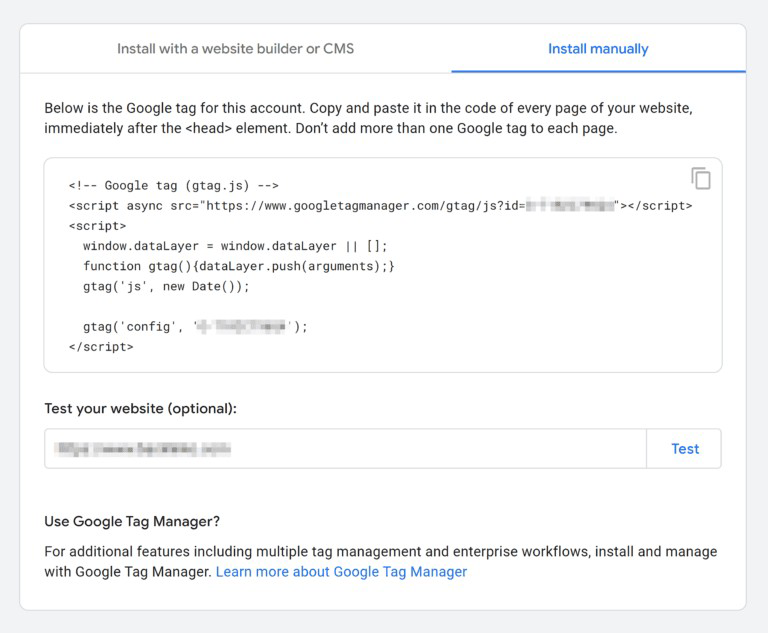
- GA4 will give you a piece of code called the tracking code or Google tag.
- Copy this code.
- Paste it into your website’s header section — this is the part of your website code that appears between “ and “ tags.
If you use website builders:
- WordPress: Use a plugin like “Insert Headers and Footers” or your theme’s settings to add the code.
- Shopify: Go to your online store settings and add the code in the theme’s header.
- Wix: Use the tracking tools section to add the GA4 tag.
If you’re unsure or don’t have access, ask your web developer to install the code for you.
Once installed, GA4 can start collecting data about your website visitors.
Step 5: Decide What to Measure (Goals and KPIs)
Before you dive into reports, it’s important to decide what matters most to your business. These are your goals and Key Performance Indicators (KPIs).
- Write down your main business goals. For example:
- Increase online sales.
- Get more newsletter sign-ups.
- Boost contact form submissions.
- Break these goals into measurable actions (KPIs), like:
- Number of purchases.
- Number of sign-up form completions.
- Number of clicks on the “Contact Us” button.
Writing down your goals and KPIs helps you focus on what to track and improve.
Step 6: Set Up Events and Conversions
In GA4, events are specific actions users take on your website, such as clicking a button or submitting a form.
- GA4 automatically tracks some events like page views and scrolls.
- For your important goals, set up custom events if needed (for example, tracking when someone completes a purchase).
- Mark key events as conversions. Conversions are the actions that directly relate to your business goals, like a sale or sign-up.
You can set up events and conversions in the GA4 dashboard under the “Events” and “Conversions” sections.
Tracking these helps you see how well your website is meeting your goals.
Read Next: How to Create a Short Video Marketing Strategy for Local Businesses
Step 7: Explore Your GA4 Reports
Once GA4 is set up and collecting data, you can start exploring the reports.
- Overview report: Gives you a snapshot of your website’s performance.
- Real-time report: Shows who is on your website right now and what they are doing.
- User demographics: Learn about your visitors’ age, gender, and location.
- Traffic sources: See where your visitors are coming from (search engines, social media, direct visits).
These reports help you understand your audience and how they interact with your website.
Step 8: Share Access (Optional)
If you have a team or work with others, you can share access to your GA4 account.
- In the GA4 settings, invite others by entering their email addresses.
- Set permissions carefully: some can only view reports, while others can make changes.
Sharing access helps your team collaborate and make data-driven decisions.
Step 9: Connect Other Tools (Optional)
To get even more from GA4, you can link it with other tools:
- Google Ads: If you run online ads, connecting GA4 helps you track how ads lead to sales or sign-ups.
- Other marketing tools: Some platforms like email marketing or customer management systems can integrate with GA4 for better insights.
These connections make your data more powerful and useful.
Conclusion
Setting up Google Analytics 4 might seem tricky at first, but by following these simple steps, even non-tech businesses can get started easily. GA4 helps you understand your customers better, improve your website, and make smarter business decisions based on real data.
Remember to review your GA4 reports regularly to see what’s working and where you can improve. It’s okay to start simple and learn more as you go. Over time, GA4 will become a valuable tool that grows with your business.
Extra Tips
- Use Google’s official help guides and support if you get stuck.
- Check your GA4 setup every few months to make sure it still fits your business goals.
- Experiment with reports and events to discover new insights.
- Consider using the GA4 demo account from Google to practice without affecting your data.
Frequently Asked Questions (FAQs)
1. Do I need technical skills to set up GA4?
No, you don’t need to be a tech expert. This guide breaks down the steps in simple language, and many website builders make it easy to add the tracking code. You can also ask a web developer for help.
2. How long does it take for GA4 to start showing data?
Once the tracking code is installed, GA4 usually starts collecting data immediately. However, reports may take a few hours to show meaningful information.
3. Can I use GA4 if I already have Universal Analytics?
Yes, you can run GA4 alongside Universal Analytics. Google recommends setting up GA4 as Universal Analytics will stop collecting data soon.
4. What are conversions in GA4?
Conversions are the important actions users take on your website that match your business goals, like making a purchase or signing up for a newsletter. Tracking conversions helps you measure success.